Monday, November 26, 2007

Gratification

I was looking for a "mailable cookie" - a sturdy enough cookie with a slightly longer shelf-life. Can't say that I chose the best kind of cookie or shall I say the best recipe, but due to lack of experience, I decided on Raspberry Lemon thumbprint cookies. I knew I had made a bad choice the moment I took one bite - this cookie was buttery, soft & airy, OH MY! It reminded me of Danish cookies that we used to get around the holidays, except not as dense & crunchy. I think the regular dense Danish cookies would have been much better for shipping, but that's not what I made. The cookies were good & I still mailed them...I hope they made it to Houston all in one piece!
~*~
Blueberry-Orange Thumbprint

1/4 cup blueberry jam
1 1/2 tsp brandy/kirsch

1 1 /8 cup AP flour
1/2 tsp baking powder
1/8 tsp salt

1/2 cup (1 stick) butter, room temperature
1/3 cup sugar
1 large egg yolk
1 1/2 tsp grated orange zest
1 1/2 tsp orange juice
1/2 tsp vanilla extract

1 egg white, lightly beaten (optional)
1/2 cup grounded almonds (optional)
  • In a small bowl, combine jam & brandy. Stir to combine & set aside.
  • In a medium bowl, combine dry ingredients & whisk to combine.
  • Using an electric mixer, cream butter & sugar till light & fluffy.
  • Beat in egg yolk, zest, juice & extract.
  • Add flour slowly & beat just until moist crumbs form.
  • Gather dough into a ball & refrigerate for about 15 minutes, or until a little firmer & easier to work with.
  • Preheat oven to 350F & line baking sheet with parchment paper.
  • In a small bowl, lightly whisk the egg white & ground the toasted almonds in a food processor if necessary.
  • With the dough, form 1-inch balls & create a deep indention in the center of each ball.
  • Roll the edges of the cookie in egg white & dip into grounded almonds until covered.
  • Place cookies about 1 inch apart on baking sheet.
  • Fill each center with 1/2 teaspoon jam.
  • Bake until lightly golden brown, about 20 - 30 minutes.
  • Transfer to wire rack for cooling completely.
  • Makes 24 cookies.

Thursday, November 22, 2007

Thanksgiving Cookies I

Pecan Bars/Squares, not sure what the difference is other than maybe how one cuts the cookies? After running into Deb's review of these Pecan Squares, I decided they seemed quite appropriate for Thanksgiving this year. This cookie spread (I, II & III) is for my boyfriend's family...I hope they enjoy it. Unfortunately I won't be able to join him this year, I'll be staying in Dallas to spend Thanksgiving with my family. I heeded Deb's advice & opted to use another shortbread crust recipe. It was hard choosing something, since I lack experience with shortbread, but decided on Nicole's crust, it seemed simple & manageable, therefore lowering my screw-up probability. I had a difficult time deciding between the crust for her Lemon Meringue Bars or her Sour Cream Lemon Shortbread Bars. I would agree with Deb that the zest makes the cookies! I personally love citrus fruit zest. I gave my parents a small sample & they absolutely loved these bars!
~*~
Pecan Bars

Crust:
1 cup AP flour
1/4 cup sugar
1/2 tsp lemon zest

6 tblspns butter, chilled & cut into chunks (freeze for 15 minutes)

Topping:
1 stick unsalted butter
1/4 cup honey
3/4 cup light brown sugar, packed
1/4 tsp lemon zest
1/4 tsp orange zest

1 tblspn heavy cream
8 ounces pecan halves (~1 cup), lightly toasted & roughly chopped
  • Preheat oven to 350F. Toast pecans, coarsely chop & set aside. Line bottom of 8-inch pan with parchment paper.
  • To make the crust, combine flour, sugar & lemon zest in the bowl of a food processor.
  • Pulse in butter until butter is well distributed & the mixture resembles moist sand.
  • Pour into a 8×8-inch baking dish & spread evenly.
  • Press down to create a firm, even layer. If necessary, use the bottom of a glass to press down on the crust.
  • Bake for 15 - 20 minutes or until edges are slightly golden & set. Allow to cool.
  • Meanwhile, for the topping, combine the butter, honey, brown sugar, & zests in a heavy-bottomed saucepan.
  • Cook over low heat until the butter is melted, using a wooden spoon to stir.
  • Raise the heat & boil for 3 minutes. Remove from the heat.
  • Stir in the heavy cream & pecans.
  • Pour over the crust, trying not to get the filling between the crust and the pan.
  • Bake for 25 - 30 minutes, until the filling is set.
  • Remove from the oven & allow to cool.
  • Once cooled, wrap in plastic wrap & refrigerate until cold. Cut into bars and serve.
**I think I may reduce the amount of butter for the topping next time. Since I did all sorts of things with sizing down & changing the recipe, the center crust was a little moist & definitely more buttery. I personally would like the center to be drier & more similar to the edges of the pan. Or I may try a different shortbread crust recipe next time.

Wednesday, November 21, 2007

Thanksgiving Cookies II


Chewy Gingerbread Cookies with Crystallized Ginger + Macadamia Nuts. I'm a big chewy cookie fan, so I had to bake these cookies. I guess gingerbread may be more appropriate for X-mas, but there's no cookie discrimination here! Personally, I did not find my cookies super chewy, maybe because the candy & nuts made it chunky, which do contribute to the overall texture of a cookie. Because they didn't seem chewy enough for me, I slightly underbaked them, which may have helped a little bit. Plus my oven was misbehaving & fluctuating greatly in temperature range. The gingerbread flavor is definitely strong & the aroma of holiday spices filled our house! I'm ready for Christmas baking, bring it on!


~*~

Chewy Gingerbread Cookies

1 1/2 cup + 1 tblspn AP flour
1 1/4 tsp ground ginger
1 tsp ground cinnamon
1/4 tsp ground cloves
1/4 tsp nutmeg
1 tblspn cocoa powder

1/2 cup (1 stick) butter, room temperature
1 tblspn freshly grated ginger

1/2 cup dark brown sugar
1/2 cup unsulfured molasses
1 tsp baking soda + 1 1/2 tsp boiling H2O

1/3 cup crystallized ginger candy, chopped into small pieces
1/2 cup macadamia nuts, toasted & coarsely chopped

1/4 cup granulated/coarse sugar
  • Chop ginger & toasted macadamia nuts; set aside.
  • In a medium bowl, sift together flour, ground ginger, cinnamon, cloves, nutmeg, & cocoa.
  • In the bowl of an electric mixer, fitted with the paddle attachment, beat butter & grated ginger until whitened, about 4 minutes.
  • Add brown sugar; beat until combined. Add molasses; beat until combined.
  • In a small bowl, dissolve baking soda in 1 1/2 teaspoons boiling water.
  • Beat half of flour mixture into butter mixture.
  • Beat in baking-soda mixture.
  • Then remaining half of flour mixture.
  • Fold in ginger candy & nuts; turn out onto a piece of plastic wrap.
  • Pat dough out to about 1 inch thick; seal with plastic wrap; refrigerate until firm, at least 2 hours.
  • Line baking sheet with parchment paper.
  • Roll dough into 2-inch balls; place 2 1/2 inches apart on baking sheets. Refrigerate 20 minutes.
  • Meanwhile, preheat oven to 325 degrees.
  • Roll dough balls in granulated sugar & return to baking sheet.
  • Transfer to oven & bake until surfaces crack slightly, about 15 - 18 minutes.
  • Let cool 5 minutes; transfer to a wire rack to cool completely.
  • Makes ~24 cookies
**My boyfriend's grandfather called me Thanksgiving night to tell me how much he enjoyed these...it's always rewarding to get positive feedback.

Thanksgiving Cookies III

Cashew-Caramel Cookies with Dried Cherries & homemade caramel candy. Cashews & caramel are definitely a really good pair because these cookies were chewy, subtle in flavor & simply delicious! Although caramel can get a little messy to bake with, it's well worth eating a "candy"-like cookie! I also want to note that I think it's important to pre-toast the cashews to bring forward all its' flavors. I just used the classic chewy cookie base to make these simple cookies. The intensive labor went into the caramel candy!
~*~
Cashew-Caramel Cherry Cookies
2 cups + 1/8 cup AP flour
1/2 tsp baking soda
1 tsp salt

3/4 cup butter (12 tblspns), melted & cooled
1 cup brown sugar
1/2 cup sugar
1 egg
1 egg yolk
2 tsp vanilla extract

3/4 cup cashews, toasted & coarsely chopped
3/4 cup dried cherries
3/4 cup caramel candy, small-sized pieces
  • In medium bowl, whisk together flour, soda & salt.
  • With the mixer on low, combine butter & sugar. Beat in the egg, egg yolk & vanilla. Slowly add flour mixture.
  • Fold in filling (nuts, etc.).
  • Refrigerate dough for 30 minutes to 1 hour.
  • Preheat oven to 325F. Line baking sheet with parchment paper.
  • Measure out dough ~ 45grams each & roll into ball, place on baking sheet. Allow some room for spreading.
  • Baking at 325F for 15 - 17 minutes, until edges turn slightly light brown. Do not overbake for chewy cookies!
  • Allow cookies to cool before removing from the baking sheet. If the caramel has not hardened, stick the baking sheet in the freezer/fridge for a few minutes.
  • Makes 18 - 24 cookies.

Pumpkin Pie

I'm a little disappointed with my pumpkin pie results, but I've learned or reconfirmed a few things:
  1. I don't like cardamon! It's just not my favorite spice, it's too overpowering. It took over the pumpkin pie! I tried to add a little more grounded cinnamon & ginger to cover it up, but may have over spiced the pie as a result. :(
  2. It may be better to use fresh roasted pumpkin or canned instead of steamed pumpkin - my pie was a little on the wet side. Or I just didn't do a good enough job "drying-out" my pumpkin puree.
  3. Maybe I need to give in & try a "tofu" pumpkin pie. I wanted to avoid tofu & used a recipe that used egg replacer & potato starch, but the whole pie just didn't quite congeal up enough for my taste.
  4. I reduced the brown sugar a little too much, although we like things not too sweet, a dessert should be a little sweeter.
  5. My parents felt guilty eating such a buttery crust, so another option using less fat would be ideal next time.
All & all, it wasn't a complete disaster & the pie was decent, just not that best egg-less pumpkin pie I've ever had - that's more of what I was going for! Well, that's normally what I'm ALWAYS going for, the best darn dessert I've ever had! It was definitely interesting making my first pie & pie crust from scratch. I still have a lot to learn, but that's what this experience is all about. Yay LIFE!
~*~
Pumpkin Pie

Crust:
1 1/4 AP flour
1/2 tsp salt
1 1/2 tsp sugar

1/2 cup (8 tblspns) butter, cubbed & frozen

2 - 4 tblspns very cold H2O

Filling:
  • For the crust:

Sunday, November 18, 2007

Homemade Caramel

I made caramel candy this weekend. Initially I was pretty scared it would not turn out since candy-making can be finicky & I basically have no experience. Plus, our house has been a little humid & that worried me too. Although my candy didn't harden up quite as much as I would like, I think a little time in the fridge will do the trick. I personally think the texture is perfect for candy eaten alone - just the right amount of chewy, but since I've never had homemade caramel before, I have nothing for comparison. Other than having caramel in candy & cookies, the only other caramel I know is from Kraft, which has a lot of nasty looking stuff listed in the ingredients. The candy is a bit soft, which makes for difficult clean cutting, so that seems to be a bit of a challenge. I plan on using this candy in some cashew-caramel cherry cookies. They're going into cookies - how bad could that be? Plus they taste fantastically delicious alone. Many things considered, maybe next time I need to allow the candy to get back to 250F instead of 244F after adding the butter & cream mixture. Plus, according to Martha's recipe, every step took a bit of time longer than it took my process, maybe I needed to lower the temperature & give the candy more time to cook? *Shrug* I have too much to learn about candy making! I have too much to learn, period.
~*~
Homemade Golden Caramel

1 cup heavy cream
1/4 cup sweetened condensed milk

1/4 cup H2O
1 cup light corn syrup
1 cup sugar
1/4 tsp salt

1/2 stick of butter (4 tblspns), cut into pieces
1 tsp vanilla extract
  • Line a half sheet pan with parchment paper. Set aside in a place where it can sit for 24 hours without being moved. (For thicker candy, line a smaller pan as candy does spread.)
  • In a small saucepan, combine heavy cream + condensed milk. Cook slowly on low until warm, be careful not to bring to a boil.
  • Meanwhile, in a heavy 6 - 8 quart pan (I used 2 quart), combine H2O, corn syrup, sugar & salt. Clip a candy thermometer to the pan. Over high heat, with a wooden spoon, stir mixture until sugar is dissolved ~4 - 12 minutes. Brush down the sides with a pastry brush dipped in water to remove sugar crystals.
  • Once sugar is dissolved, stop stirring, reduce heat to medium, bring to a boil & without stirring, continue cooking until temperature reaches 250F (hard-ball stage), ~45 - 60 minutes (took me ~12 - 15 minutes).
  • Keep an eye on cream mixture & make sure it's warm, but not boiling.
  • When sugar mixture reaches 250F, while stirring, add butter pieces & SLOWLY add warmed cream mixture, be careful as this will bubble up & be extremely hot. Keep mixture boiling at all times.
  • Stirring constantly, cook over medium heat until mixture reaches 244F (firm-ball stage), ~55 - 75 minutes (took me ~18 - 20 minutes).
  • Stir in vanilla extract.
  • Immediately pour into prepared pan without scraping pot.
  • Let stand uncovered at room temperature, without moving, for 24 hours. (I tented mine with some parchment paper.) **To clean saucepan, fill the pot with H2O & bring to a boil, the caramel will dissolve & come off for easy cleaning.**
  • Cut into pieces or desired shapes & wrap in cellophane or wax paper. (Pop in fridge for a few minutes before cutting to harden candy slightly if necessary.)

Thursday, November 15, 2007

Variations

Variations of a similar cookie recipe:
Original Cocoa Fudge Cookies
Cocoa Fudge w/ Cherries
Chewy Cocoa Fudge w/Chocolate Chips
Vegan Cocoa Fudge
My addition - Cocoa Fudge w/ Chocolate & Cappuccino Chips.
I have to admit, I didn't review the different variations before baking up these cookies, although I should have done the compare & contrast thing!
The name of the cookie included "chewy''! - can't go wrong there right? Unfortunately, I would not categorize mine as chewy. I would agree with Nicole that the cookies were "soft & rich"...I would agree with Molly that the cookies are "dark, and dense with chocolate flavor, but not too sweet". But that's baking, it could be any little minor factor or detail that would put my cookies more in the brownie, dense, cake-like cookie category. Don't get me wrong, these taste really good...just not what I expected. I was actually looking for an easy replacement for these Chewy Chocolate Espresso cookies. I had some extra yogurt & the recipe seemed simple & easy. The cookies did not spread really, but puffed up instead. The original recipe called for 5 tablespoons of butter instead of 4, so I may try that next time. Instead of scooping the flour, I will spoon & level, & I'll try to be more accurate when measuring the cocoa powder. I did reduce the sugar to 3/4 cup from 1 cup, but I doubt that made a big difference. I made sure not to overmix the batter, but it was thick & more like a brownie mixture. I wonder how these would hold up to whole wheat pastry? More puffier? No cappuccino chips? Espresso powder can provide the coffee kick.
~*~
Brownie-Like Cookies
1 cup AP flour
1/4 tsp baking soda
1/8 tsp salt

4 tblspns butter (5 tblspns next time)
7 tblspns unsweetened cocoa powder
1/2 cup granulated sugar
1/4 cup brown sugar
1/3 cup yogurt
1 tsp vanilla extract

1/4 cup chocolate chips
1/4 cup cappuccino chips
  • Preheat oven 350F. Line baking sheet with parchment paper.
  • Lightly spoon flour into a dry measuring cup & level with a knife. Combine flour, soda, & salt; set aside.
  • Melt butter in a large saucepan over medium heat. Remove from heat; stir in sifted cocoa powder & sugars (mixture will resemble coarse sand).
  • Add yogurt & vanilla, stirring to combine.
  • Add flour mixture, stirring until moist.
  • Fold in chips.
  • Drop by level tablespoons 2 inches apart onto baking sheet - press down slightly to flatten - cookies barely spread. (Cookies may spread more with extra tablespoon of butter.)
  • Bake at 350° for ~8 - 10 minutes or until almost set.
  • Cool on pans 2 to 3 minutes or until firm. Transfer to cooling rack.
  • Makes ~20 cookies.

Wednesday, November 14, 2007

Peanut Butter

These peanut butter bars are REALLY SIMPLE & delicious to whip up in a jiffy (I didn't even plan ahead & defrost my ingredients). Personally, I think they're better than peanut butter cookies. The texture is chewy, thick, rich & the peanut butter flavor is prominent - although not much is used...this is a great way to use up that small amount of peanut butter leftover. Although I reduced the amount of sugar, it was still a little on the sweet side for my taste since raisins are pretty sweet all on their own. I'm normally not a big fan of raisins, but I find them quite enjoyable when they're cut into smaller pieces, personal preference I guess. Plus I can't tell they're raisins! :)
~*~
Peanut Butter Raisin Bars
1/4 cup creamy unsweetened peanut butter (2 ounces)
1/4 cup salted butter (4 tblspns)

1/2 cup sugar (little less next time)
1 large egg
2 tsp vanilla extract

1/2 cup AP flour
3/4 tsp baking powder

3/4 cup raisins, chopped
dark chocolate chips, for sprinkling
  • Preheat oven 350F. Butter & flour 6X9 glass pan, set aside. **It may be wise to line the bottom of the pan with some parchment paper.
  • Combine peanut butter & butter in a saucepan over medium-low heat until melted. Allow to cool.
  • Add sugar, egg & vanilla extract. Stir to combine.
  • Add flour & baking powder.
  • Fold in chopped raisins.
  • Spread batter into prepared pan & sprinkle the top with some chocolate chips (optional) - press them into the batter slightly.
  • Bake for ~25 - 30 minutes, till the top is lightly golden brown & a toothpick inserted in the center comes out clean.
  • Allow to cool completely before cutting into bars.
  • Makes 8 small bars or 6 large ones.

Tuesday, November 13, 2007

Cranberries

I too had some fresh cranberries awaiting in the freezer to be devoured. It's been particularly warm for a November in Texas, so I used Susan's recipe for cranberry sorbet. I used a little less cranberries so I would not have to use so much sweetener. To avoid dishes by using the food processor a second time, I just tried to create a pseudo-granita/snowcone like texture (I've never had a granita, but have seen Giada do something similar on Food Network). The final result was slightly tart, yet refreshing.
~*~
Homemade Cranberry Sorbet
6 - 7 ounces cranberries, fresh/frozen & thawed
2 ripe pears, cored
1/4 - 1/3 cup sweetener, (honey, agave + xylitol)
1/2 cup H2O
lemon/lime/orange zest
  • Put all ingredients in food processor.
  • Process until completely smooth.
  • Taste for additional sweetener if necessary.
  • Pour into a shallow glass pan & freeze. "Fluff" sorbet with a fork about every hour.
  • Serve cold.

Sunday, November 11, 2007

Oatmeal

Thank you Dreena for another successful chewy vegan oatmeal cookie! Instead of raisins, I used dried cranberries & omitted the refined sugar.
~*~
Chewy Oatmeal Cookies
3/4 cup + 1 tblspn whole spelt flour
1 tsp baking powder
1/4 tsp baking soda
1/2 tsp ground cinnamon
1/4 tsp nutmeg
1/4 tsp salt
1/2 cup quick cook oats
1/4 cup dried cranberries (raisins, chips, nuts, coconut)

1/4 cup + 2 tblspns liquid sweetener (brown rice syrup + maple + agave)
1/4 cup coconut oil
1/4 tsp blackstrap molasses
1 1/2 tsp vanilla extract
  • Preheat oven 350F. Line cookie sheet with parchment paper.
  • In a large bowl, sift & combine together flour, powder, soda, spices, & salt.
  • Stir in oats & add dried cranberries.
  • In a liquid measuring cup, measure out sweetener & oil. Add molasses & extract. Stir around to combine.
  • Pour the wet ingredients into the dry & stir till well combined, do not overmix.
  • Spoon & divide batter evenly on baking sheet, allow some room for spreading.
  • Bake for 11 minutes for a chewy cookie.
  • Remove from oven, cool on baking sheet for 1 minute & transfer to cooling rack.
  • Makes 9 - 12 cookies.

Friday, November 9, 2007

Spicy Trail Mix

Although I recognize roasted nuts are incomparable, nutritionally speaking, to raw & soaked nuts, sometimes I crave to be a bad bad girl. These spicy glazed nuts & pretzels are perfect for the rebel in me. I used a mix of organic nuts - cashews, almonds, pecans & pistachios & Newman's spelt pretzels. Let's just say I ate most of it before I had a chance to take any halfway decent pictures. Yum, yum & some more yum.
~*~
Spicy-Sweet Trail Mix
1 cup mixed nuts, raw

1/2 tblspn butter, melted
1 1/2 tblspns dark brown sugar
1/4 tsp ground cinnamon
3/8 tsp cayenne pepper
1 tblspn maple syrup (little less)

1 cup small pretzels twists
1 tsp coarse salt
  • Preheat oven 350F. Slightly roast nuts on a lined baking sheet, about 5 - 10 minutes.
  • In a medium bowl, mix together melted butter, brown sugar, cinnamon, cayenne & maple syrup.
  • Add nuts & pretzels to spicy mixture - thoroughly coat.
  • Sprinkle on coarse salt.
  • Spread mixture back on lined baking sheet & return to oven for additional 10 minutes, stirring once to allow even baking.
  • Remove from oven & cool completely. There's no need to separate nuts from pretzels since they taste best eaten together! :)
  • Once cooled, store in an airtight container for up to 4 days - if they even last that long!
  • Makes about 2 cups.

Subtle & Not Beautiful

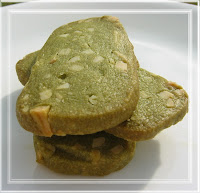
I am a little disappointed with my green tea almond shortbread cookies. I imagined beautiful elegant cookies. Well, damper on my party, I had a freakin' hard time making them look pretty. This really teaches me to appreciate cut out cookies & remind me that I suck at it. First I tried to cut it from a log, & then I tried to use cookie cutters...I just couldn't get them to look all gorgeous beautiful & perfect. I'm not quite sure what my problem was, if I knew, I'd fix it! The dough has to be just the right temperature, the knife has to be sharp & there's some technique/experience there that I'm lacking. Plus my shortbread puffed up a bit!! No one else's looked puffy, they look perfectly flat & dense. Arrgghh!! Maybe I somehow overworked the dough, over fluffed my butter, or I reduced the sugar too much & the almonds made it difficult to get a clean cut. Otherwise, the green tea flavor was subtle, the cookie was dense & just slightly crumbly, not too sweet & the butter flavor was fragrant, as always.


~*~
Green Tea Almond Shortbread
1/2 cup butter (1 stick), room temperature
1/2 powdered sugar
1/2 tsp almond extract
1/4 tsp salt

1 cup AP flour
(spooned & leveled)
1 1/2 tblspn matcha green tea powder

3/8 cup sliced almonds
  • In a stand mixer, beat together butter, sifted powdered sugar, almond extract & salt until smooth.
  • In a separate bowl, sift the flour & green tea powder. Slowly add to butter mixture to form a dough.
  • Hand fold in almonds.
  • On parchment paper, form the dough into a log (6 inches long, 2 1/2 inches wide & 1 inch thick), & freeze until firm ~1 hour (or up to 3 months covered in plastic wrap).
  • Remove dough from freezer (if dough is too hard, defrost for 20 - 30 minutes to allow cutting without crumbling).
  • With a sharp knife, cut slices about 1/4 inch thick.
  • Place on parchment-lined baking sheet about 1 inch apart. Refrigerate dough for another 15 minutes.
  • Preheat oven 325F.
  • Bake ~20 - 25 minutes, till edges turn just about light golden.
  • Cool on baking sheet for 5 minutes, transfer to cooling rack.
  • Makes about 20 cookies.

One Step Closer...

I'm still on the look out for an easy, vegan, gluten-free, wheat-free cookie recipe. I admit I haven't been trying super duper hard, but I've bought some recipe books & I'm looking...I'm just waiting for certain organic flours to arrive via UPS. Most recipes require a gluten-free flour mixture and/or eggs, so this should be interesting. Plus, the few that I've had, had a distinct tapioca texture. *Sigh*
Yesterday, I got lucky! I came across Dreena Burton's recipe for Gluten-Be-Gone Homestyle Chocolate Chip
Cookies from ED&bV. Thank you Lord for answering my prayers! I got to taste one while it was still warm, but am looking forward to tasting it the day after. This was a very simple recipe & did not require many dishes - which I LOVE! I just used a large mixing bowl & mixed my liquids in my measuring cup. The cookie batter was wet & cohesive - a GOOD SIGN! It wasn't all crumbly & falling apart. This recipe definitely appealed to me because of the small amount of tapioca flour...I still think it was noticeable, but I'm hoping I'll have a different opinion today. *Fingers crossed* Eventually, I would like to replace the brown sugar. I may need to increase the amount of flour as a result...I think I may have also used 1/4 tsp baking powder** instead of 1 tsp. Opps. Also, before baking, I placed the dough in the fridge for about 15 - 30 minutes, giving the brown rice syrup & coco oil a chance to harden & reduce cookie spread.
~*~
Gluten-Free Cookies!
3/4 cup + 1 tblspn brown rice flour/amaranth flour
2 tblspn tapioca flour
1 tsp xanthum gum
1/4 tsp salt
1/4 tsp baking soda
1 tsp baking powder**
1/4 cup brown sugar (little less)

1/3 cup maple syrup (brown rice syrup, agave nectar & maple)
1/4 tsp blackstrap molasses
1 1/2 tsp vanilla extract
3 1/2 tblspn coconut oil

1/8 cup carob chips
1/8 cup white chocolate chips
1/8 cup coconut flakes, unsweetened
1/8 cup dried cranberries
  • In a large bowl, combine all dry ingredients + sugar.
  • Measure your sweetener in a liquid measuring cup & add to that the molasses, vanilla extract & coconut oil. Stir around to combine.
  • Poor the wet ingredients into the dry, including the filling (nuts, fruits, chips, etc) & fold to combine.
  • Refrigerate dough for ~15 - 30 minutes.
  • Preheat oven to 350F & line cookie sheet with parchment paper.
  • Divide dough into 12 balls (~32grams) (Flatten cookie ever so slightly before baking.) Bake for 11 minutes.
  • Remove from oven & cool on baking sheet for a few minutes.
  • Carefully remove from parchment paper, an offset spatula may be necessary, & place on cooling rack.
**I've made this a few more times since this post & one time I used 1 tsp baking powder - the cookies were really puffy & did not spread much at all. Another time I used 1/2 tsp + a little more & the cookies were more to my liking...flatten cookies slightly before baking for 1/2 - 1 tsp baking powder. I've also omitted all dry sugar & added about another tablespoon of brown rice flour with great success.

Saturday, November 3, 2007

Newlyweds

My uncle just got back to the U.S. with his new wife & to celebrate, I baked up some VCTOTW Carrot cake cupcakes, Cook's Illustrated Chewy "chocolate chip" cookies & his all time favorite, Pumpkin muffins (VWaV). Talk about a sweet celebration! The "chocolate chip" cookies are really really chewy thanks to the caramel candy, dried cherries & crystallized ginger candy...which all have the chewiest texture!
~*~
Carrot Cake Cupcakes
1/2 cup sugar (little less)
1/3 cup oil (coconut oil)
1/3 cup vanilla yogurt (soy or regular)
1 tsp vanilla extract

2/3 cup whole wheat pastry - 1/4 cup (4 tblspns)
1/4 cup AP flour + 1 to 2 tsp
1/2 baking soda
1/2 tsp baking powder
1/4 tsp salt
1/2 tsp ground cinamon
1/2 tsp ground ginger
1/8 tsp ground allspice

1 cup grated carrot (2 - 3 medium carrots)
1/2 cup raisins, finely chopped
1/2 cup walnuts, roughly chopped
  • Preheat oven 350F & line muffin pan with 12 cupcake liners.
  • In medium bowl, whisk together sugar, oil yogurt & vanilla.
  • Sift dry ingredients - flour, soda, powder, salt, cinnamon, ginger & allspice until no lumps remain. Stir batter to incorporate.
  • Fold in carrots, raisins & walnuts.
  • Divide batter evenly among 11 -12 liners. (Do not overfill, or these will spill over. The muffin cups will be about 1/2 - 3/4 full. Rather them come out small than ruined! Personal experience).
  • Bake 26 - 28 minutes, until toothpick comes out clean.
  • Allow to cool completely on cooling rack.
~*~
Really Really Chewy Cookies!
2 cup + 1/8 cup AP flour
1/2 tsp baking soda
1 tsp salt

3/4 cup butter (12 tblspns), melted & cooled until just warm
1 cup brown sugar (little less)
1/2 cup white sugar (little less)
1 egg
1 egg yolk
2 tsp vanilla extract

1/2 cup dried cherries, chopped
1/2 cup ginger candy, chopped
1/2 cup caramel candy, chopped

1/2 cup macadamia nuts, chopped
  • In medium bowl, whisk together flour, soda & salt.
  • With the mixer on low, combine butter & sugar. Beat in the egg, egg yolk & vanilla. Slowly add flour mixture.
  • Fold in filling (nuts, etc.).
  • Refrigerate dough for 30 minutes to 1 hour.
  • Preheat oven to 325F. Line baking sheet with parchment paper.
  • Measure out dough ~ 45grams each & roll into ball, place on baking sheet. Allow some room for spreading.
  • Baking at 325F for 15 - 17 minutes, until edges turn slightly light brown. Do not overbake for chewy cookies!
  • Allow cookies to cool before removing from the baking sheet. If the caramel has not hardened, stick the baking sheet in the freezer/fridge for a few minutes.
  • Makes 18 - 24 cookies.
~*~
Pumpkin Muffins
1 cup AP flour
3/4 cup whole wheat pastry
3/4 - 1 cup sugar
1 tblspn baking powder
1/4 tsp salt
1 tsp ground cinnamon
1/2 tsp nutmeg, freshly grated
1/2 tsp ground ginger
1/2 tsp ground allspice
1/8 tsp cloves

1 cup pureed pumpkin (fresh or from can)
1/2 cup rice/oat/soy milk
1/2 cup coconut oil
2 tblspns moasses

1/2 cup walnuts, chopped
1/2 cup bittersweet chocolate chips
  • Preheat oven to 400F. Line twelve-muffin tin.
  • In large bowl, sift together flour, sugar, baking powder, salt & spices.
  • In a separate bowl, whisk together pumpkin, milk, oil & molasses. Pour the wet ingredients into the dry & mix till just combined (do not overmix).
  • Fold in chopped nuts & chocolate chips (or dried fruit).
  • Fill the muffin cups 2/3 full.
  • Bake for 18 - 20 minutes, until toothpick comes out clean.