 I was looking for a "mailable cookie" - a sturdy enough cookie with a slightly longer shelf-life. Can't say that I chose the best kind of cookie or shall I say the best recipe, but due to lack of experience, I decided on Raspberry Lemon thumbprint cookies. I knew I had made a bad choice the moment I took one bite - this cookie was buttery, soft & airy, OH MY! It reminded me of Danish cookies that we used to get around the holidays, except not as dense & crunchy. I think the regular dense Danish cookies would have been much better for shipping, but that's not what I made. The cookies were good & I still mailed them...I hope they made it to Houston all in one piece!
 ~*~
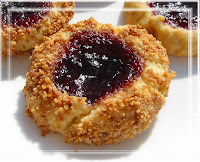
~*~Blueberry-Orange Thumbprint
1/4 cup blueberry jam
1 1/2 tsp brandy/kirsch
1 1 /8 cup AP flour
1/2 tsp baking powder
1/8 tsp salt
1/2 cup (1 stick) butter, room temperature
1/3 cup sugar
1 large egg yolk
1 1/2 tsp grated orange zest
1 1/2 tsp orange juice
1/2 tsp vanilla extract
1 egg white, lightly beaten (optional)
1/2 cup grounded almonds (optional)
- In a small bowl, combine jam & brandy. Stir to combine & set aside.
- In a medium bowl, combine dry ingredients & whisk to combine.
- Using an electric mixer, cream butter & sugar till light &
 fluffy.
 - Beat in egg yolk, zest, juice & extract.
- Add flour slowly & beat just until moist crumbs form.
- Gather dough into a ball & refrigerate for about 15 minutes, or until a little firmer & easier to work with.
- Preheat oven to 350F & line baking sheet with parchment paper.
- In a small bowl, lightly whisk the egg white & ground the toasted almonds in a food processor if necessary.
- With the dough, form 1-inch balls & create a deep indention in the center of each ball.
- Roll the edges of the cookie in egg white & dip into grounded almonds until covered.
- Place cookies about 1 inch apart on baking sheet.
- Fill each center with 1/2 teaspoon jam.
- Bake until lightly golden brown, about 20 - 30 minutes.
- Transfer to wire rack for cooling completely.
- Makes 24 cookies.


